Article for advanced users
Information on this page is intended for users with advanced technical knowledge.Update your Treon Industrial Node via SSH
This article describes the process of updating your Treon Industrial Nodes and Industrial Nodes 6 to the latest Treon Aito Release for Industrial Node via an SSH connection to your Treon Gateway.
1 Schedule the Update
The update process will approximately take 2 to 5 hours for smaller networks of 10 or less Industrial Nodes, with most nodes connecting directly to the Treon Gateway.
For larger networks, the update time can be considerably longer. E.g., in networks that contain 100 or more Industrial Nodes, it can take 16 hours and even longer to update all the nodes.
Please note: In some cases it can happen that not all Industrial Nodes in the network will update. If this happens, it is necessary to start the update process again. If after multiple attempts one or more Industrial Nodes did not update, it is likely that they are not able to download the image properly due to the routing within the network. In this case, please see the troubleshooting or contact Treon Customer Support.
2 Establish the SSH Connection
For the update process you need to connect to the Treon Gateway via SSH.
For more information on how to connect to your Treon Gateway, please see this article.
Treon Aito Release 6.2 for Gateway and lower:
In case your Treon Aito Release for Gateway is version 6.2 or lower, you either need to update your Treon Gateway or apply a patch in order to perform the update of your Industrial Nodes and Industrial Nodes 6.
If you would like to update your Treon Aito Release for Gateway, please see this article.
If you would like to install the patch, use the following command. The procedure will only take a few minutes.
sudo curl --insecure --cert /mnt/identity/device_cert.pem --key /mnt/identity/device_key.pem
https://debug.treon.fi/patches/DST-X3-cert-removal.44046e99.202110061015.sh > /tmp/patch.sh && sudo bash /tmp/patch.sh
After successfully patching the Treon Gateway, you should get a return that looks like this: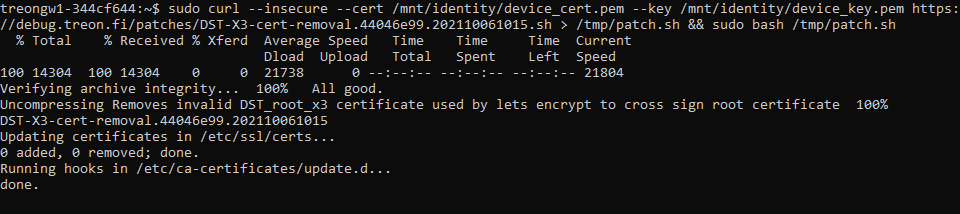
Please note: All update and patch files will be downloaded to the /tmp/ directory, where also log files will be created. This means that after the Treon Gateway is rebooted, all these files will be deleted automatically. If you have rebooted the Treon Gateway but need to perform more updates, you will need to go back to this step.
3 Downloading files
Now it is time to download the update file. Afterwards, its checksum needs to be checked to ensure that the download went well.
To download the update file and the checksum file, execute the following commands.
Please note that the terms LINKBIN, FILE, LINKCHK and TARGET need to be replaced with the data for your Treon product, which you can find from support@treon.fi
sudo curl --key /mnt/identity/device_key.pem --cert /mnt/identity/device_cert.pem **LINKBIN** -o /tmp/**FILE**

sudo curl --key /mnt/identity/device_key.pem --cert /mnt/identity/device_cert.pem **LINKCHK** -o /tmp/checksum.chk
After successfully downloading the files, you should get a return that looks like this:
4 Verifying Checksum
After both files for your Treon product have been downloaded, it is important to check the integrity of the downloaded file. In case the file did not download correctly and is corrupted, the update process might harm your Treon products.
In order to verify the checksum, enter the following command:
cd /tmp ; md5sum -c /tmp/checksum.chk
After executing the command, you should get a return saying that the file is OK.
If the reply states that there was an error in the checksum, do not continue with the update process! Start the process again with step 3 and re-download the files, then verify them again. If you keep having problems, please see the troubleshooting at the bottom of the article. In case the problems cannot be solved, please contact Treon Customer Support.
5 Installing update
Now that the update file is downloaded and the checksum verified, the update can be applied. Use the following command:
sudo nohup nodefwupdater -file /tmp/**FILE** -target **TARGET** > /tmp/nodeupdate.log &
Please note that FILE and TARGET are the values from the table for your Treon product under step 3 in this guide.
If your network is bigger than 15 nodes, it might be necessary to increase the standard timers in the parameters of the command. This will increase the time the update takes significantly, but is necessary so all the Industrial Nodes get updated.
An example for increased timers for a large network:
sudo nohup nodefwupdater -file /tmp/**FILE** -tcomplete 60 -tfrag 8000 -trigger 60 -tstart 60 -twait 180 -target **TARGET** > /tmp/nodeupdate.log &
You can check on the status of the update process with:
tail -f /tmp/nodeupdate.log
Here an example of the update in progress: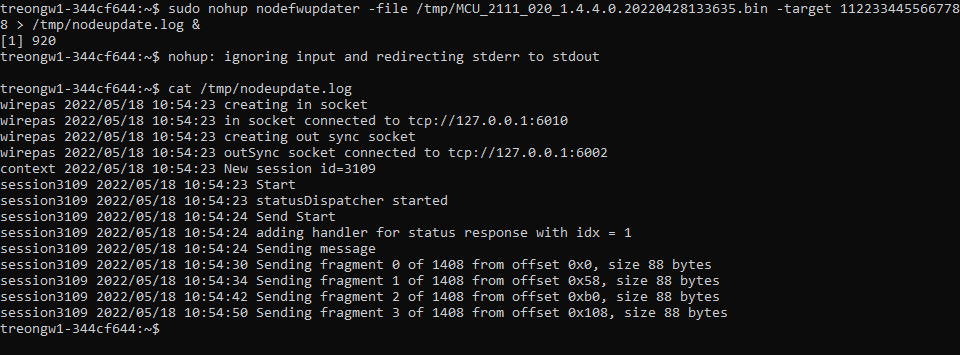
During the update, new status messages appear about every 15-20 seconds. When no more status messages are sent, the update has completed. The last two messages should read “Destroying context” and “Active session”.
After a successful update, the Industrial Nodes and Industrial Nodes 6 will perform a restart. This can take up to 5 minutes.
Now you should verify the Treon Aito for Industrial Node version to make sure the update has been successful. You can do this with the command line:
sudo /usr/sbin/command_node -i BROADCAST -c GET,DEVICE,SWVER -t 60
The return will give you the Treon Aito Release version of your Treon Industrial Node products.
Troubleshooting:
In case the update process does not go smoothly, please see if you can solve the issue with our Troubleshooting section. In case you need further help, please contact Treon Customer Support.
Problem: Multiple attempts at updating the Industrial Nodes have failed
In case you have tried multiple times to update your Treon Industrial Nodes, and none of them has successfully updated, it is important to check the log file created during the update process.
To open the update log file, use the command tail -n 50 /tmp/nodeupdate.log, which should return a log that looks like this:
session58600 2022/05/11 22:33:06 Node 14764138:
start [Index: 1, Node: 14764138, Status: 0x0, IdRecord: 63005cccc1df]
complete [Index: 2, Node: 14764138, Status: 0x3, IdRecord: 63005cccc1df]
commit [Index: 3, Node: 14764138, Status: 0x4, IdRecord: 63005cccc1df]
session58600 2022/05/11 22:33:06 Node 9648842:
start [Index: 1, Node: 9648842, Status: 0x0, IdRecord: 630049bb1393]
complete [Index: 2, Node: 9648842, Status: 0x0, IdRecord: 630049bb1393]
commit [Index: 3, Node: 9648842, Status: 0x0, IdRecord: 630049bb1393]
session58600 2022/05/11 22:33:06 statusDispatcher stopping
context 2022/05/11 22:33:06 Destroying context
context 2022/05/11 22:33:06 Active session 58600
context 2022/05/11 22:33:06 Removing session 58600
context 2022/05/11 22:33:06 Shutting down
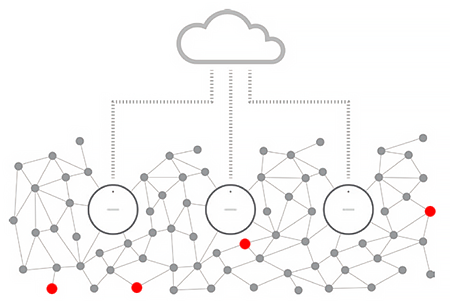
Here, for each Industrial Node within the MESH network a status is returned.
Status messages:
Status:0x0 = Successful update
Status:0x3 = Message not successfully transmitted
Status:0x4 = Install aborted due to incomplete image file
Status:0x5 = The node is not the right “target”
It is normal to have several of these statuses if you have a mix of Industrial Nodes and Industrial Nodes 6. If they all return an error 0x5, then it is possible the the wrong TARGET in step 3 is used in the update command under step 5.
If all of your nodes return 0x3 and 0x4 messages, then you need to increase the timeouts as described under step 5. Try using the command example provided for larger networks. If that does not solve the issue, the timers can be increased further.
Problem: Some of the Industrial Nodes keep rejecting the update
It is possible that due to the order in which the message is transmitted between the nodes in the mesh network, some individual Industrial Nodes always miss some fragments. This problem is due to the self-organisation of the mesh network configuration after initial installation.
An easy solution is to bring those Industrial Nodes that reject the update physically closer to the gateway and afterwards reboot the gateway. Then start the update procedure again from step 5. For this method it needs to be possible to move the Industrial Node closer to the Treon Gateway, or the gateway closer to the Industrial Node. The idea behind it is that the mesh network will automatically reconfigure itself differently, and the nodes that previously could not update would then be in a more favourable position within the mesh network.
If that is not an option in your physical setup, is is also possible to increase the timers in the update command. Try using the command provided for larger networks under step 5. If that does not solve the issue, the timers can be increased further. Please note that this will increase the time needed for the update considerably.
Problem: The Gateway patch always returns an error
In case you try to use the patch on a Treon Gateway that has already software release 6.3 or higher installed, or this patch has already been installed previously, you will get an error as return.
Error when the Treon Aito Release for Gateway is 6.3 or higher:
Error when the Treon Gateway patch has already been applied to this Gateway:
In both cases, you can simply continue with step 3 of the installation process. Your Treon Gateway is already adjusted to perform the update of the Treon Industrial Nodes.
Problem: The checksum always returns an error
The checksum verification always returns an error, even after you re-downloaded both the update and the checksum files.
Error when the checksum does not match:
Error when the checksum file cannot be found:
Please make sure you use the whole command line:
cd /tmp ; md5sum -c /tmp/checksum.chk
or:
cd /tmp
md5sum -c /tmp/checksum.chk
It is important to execute both commands back to back. The checksum can also fail if you made changes to the previous commands resulting in downloading the file to a different folder or with a different name. In this case you have to adapt the update command accordingly.
Problem: The Treon Industrial Node cannot be reached after the update
In rare cases it can happen that an Treon Industrial Node or Treon Industrial Node 6 turns off after the update instead of rebooting. In this case, simply turn the device on again by pressing the power button.
Treon Support
You still have questions? Our dedicated team of experts is happy to help you! Please contact Treon Support directly by e-mail.
Did you know? Treon offers Premium Support and Maintenance Packages for our customers. Get even more out of Treon and boost your sales - inquire now about features and prices!

Last updated on Jun 4, 2026